Everything you wanted to know about Windows Autopilot Deployment Program (Part 4)
Possible scenarios – hybrid Azure AD join and Autopilot for existing devices
If you would like to read the other parts in this article series, please go to:
Autopilot is a service from Microsoft that simplifies Windows deployment on new and existing devices. In the previous article, user-driven mode, reset, and self-deploying mode were highlighted. Today we will focus on two other very much anticipated scenarios.
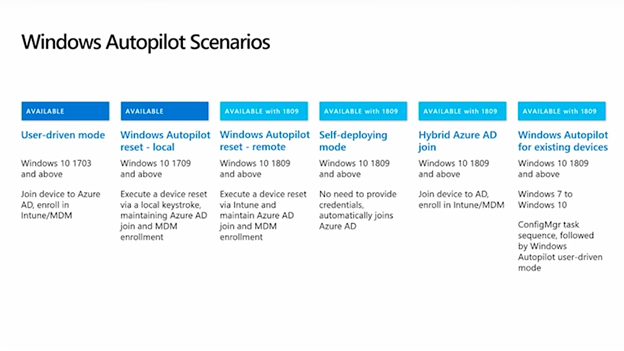
Hybrid AAD join
According to customers' feedback, numerous companies are interested in joining devices to on-prem domains via OOBE, which was impossible to do before. The hybrid scenario allows you to do this, as a computer is registered in both of your on-prem AD and AAD. The interesting thing is that you might already be in such a situation, if you've deployed AAD Connect and run Windows 10 1607 or later (there is already code in Windows that automatically registers your domain joined devices into AAD, if you've deployed AAD Connect). If these terms aren't confusing enough, we'll throw in one more -- some of you also refer to this scenario as DJ ++ (where "DJ" stands for Domain Joined).
At the same time, Autopilot clients expect to be able to auto-accept the Windows EULA, skip privacy pages, rename devices, and then choose whether that first user is admin or standard -- everything they got used to with the user-driven mode. It really should be as easy as registering your device into Autopilot, assigning a profile, and booting your device for the first time. If it goes beyond these three steps, it's not making it easier for the end user.
Thanks to one technology, all these conditions were met, and we'll take a moment and switch into the specifics of how it works.
What is behind the scenes of Autopilot hybrid AAD join?
The technology in question is not new; it's been around for quite some time and is called ODJ blob, which stands for offline domain join blob. Here, blob is surely not an amorphous object with undefined shape and size. In computer terms, it is a Binary Large Object, used for storing information in databases. In fact, you can create a blob from any AD connected machine or from a server. The sample command is on the picture below:

The best way to make heads or tails of ODJ blob is to imagine that it stores the credentials for any given machine to join your AD.
OOBE for hybrid deployment
When starting a machine for the first time that has a hybrid AAD profile assigned to it, you'll get the following experience. During boot up, you will connect the machine to the network (that has direct connection to your DC; VPNs are not supported) and it will download the Autopilot profile. The computer will prompt you to sign in with your AAD credentials (tied to your tenant). If you set up multifactor authentication on your AAD tenant, MFA will be there too. At this point, the machine will skip joining into AAD and instead will enroll in MDM. Acting on the "DJ" device configuration profile (we will talk about that soon), the computer will ask for an ODJ blob from Intune. The MDM will pass a request to the Connector, which will create the blob, send it back, and Intune will pass it to this machine.

A reboot will indicate that everything described above has happened (if instead of reboot you see an error on the screen, it will mean the DC wasn't found):
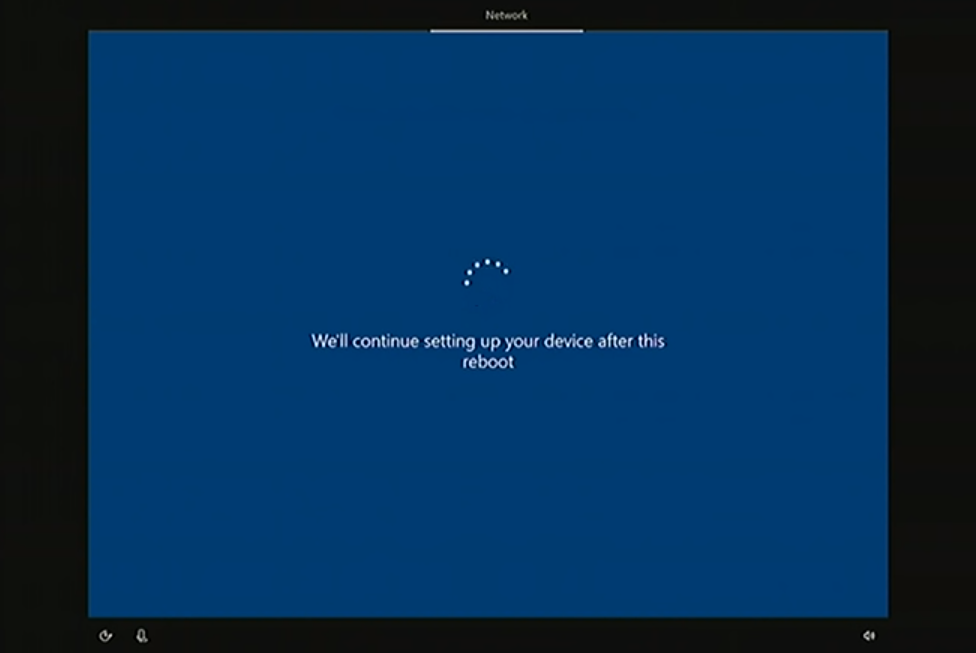
This reboot will update the device name to match the object created on your behalf on the DC. The rest of the experience is familiar to you from previous scenarios -- you'll see the ESP, and all your configurations will come down to the machine. When it is over, you'll be prompted to enter your AD credentials and will land on the desktop.
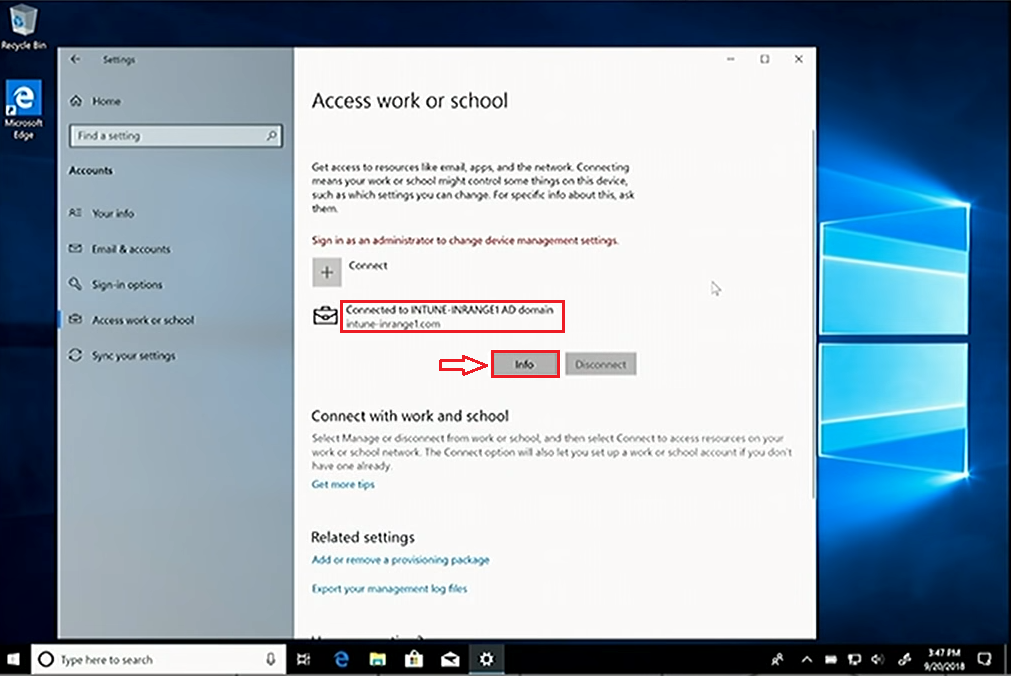
If you check the Settings page and click on Accounts, you'll discover that the device is joined to the on-prem domain and MDM enrolled, as indicated by the Info button that could report the details of enrollment.
If your domain or Intune automatically pushes down the System Center Configuration Manager (SCCM), your device will also be co-managed. Thanks to this scenario, the new computer will fit perfectly into your digital estate, and a modern deployment method is going to save you a ton of money.
Let's take a quick look at the steps you need to take to make this process fly.
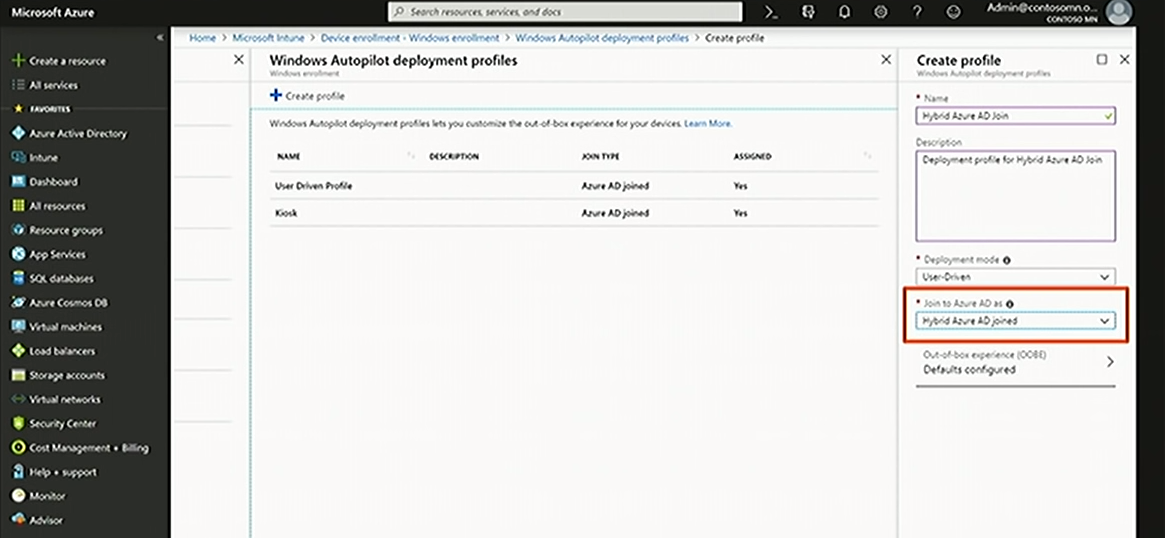
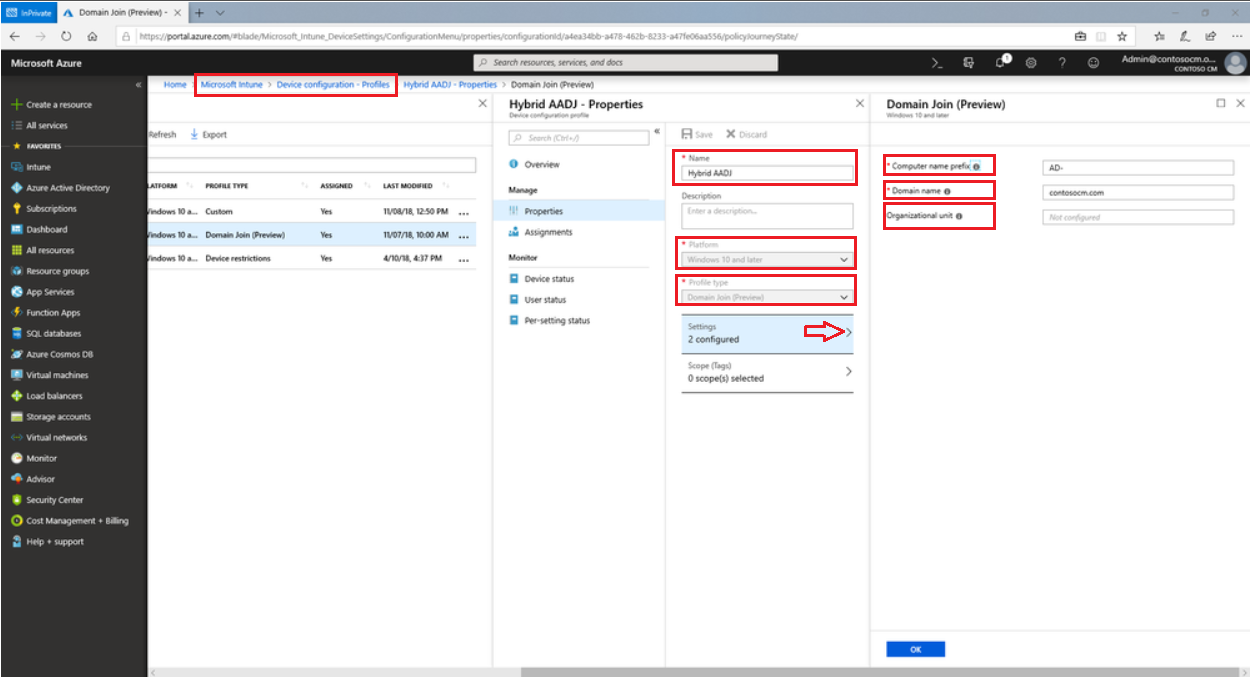
1. Create a profile for hybrid AAD join
If you had a chance to go through the previous articles on the subject, you already know how to create a profile (if you haven't, you can find out here ). The only difference is that you pick Hybrid AAD joined in the second dropdown menu.
2. Install Connector
This Connector for AD, as you already know, is utilized by Intune to communicate with on-prem DC during deployment. You will need Windows Server 2016 or later, and before you start an installation, also check out your language pack, as Connector can be installed on a computer with a certain keyboard layout only. You can learn the details here.
As pre-conditions are mentioned, let's move to Connector installation on a DC. In Intune find Device Enrolment, then under Windows Enrollment -- Intune Connector for AD and choose Add connector.
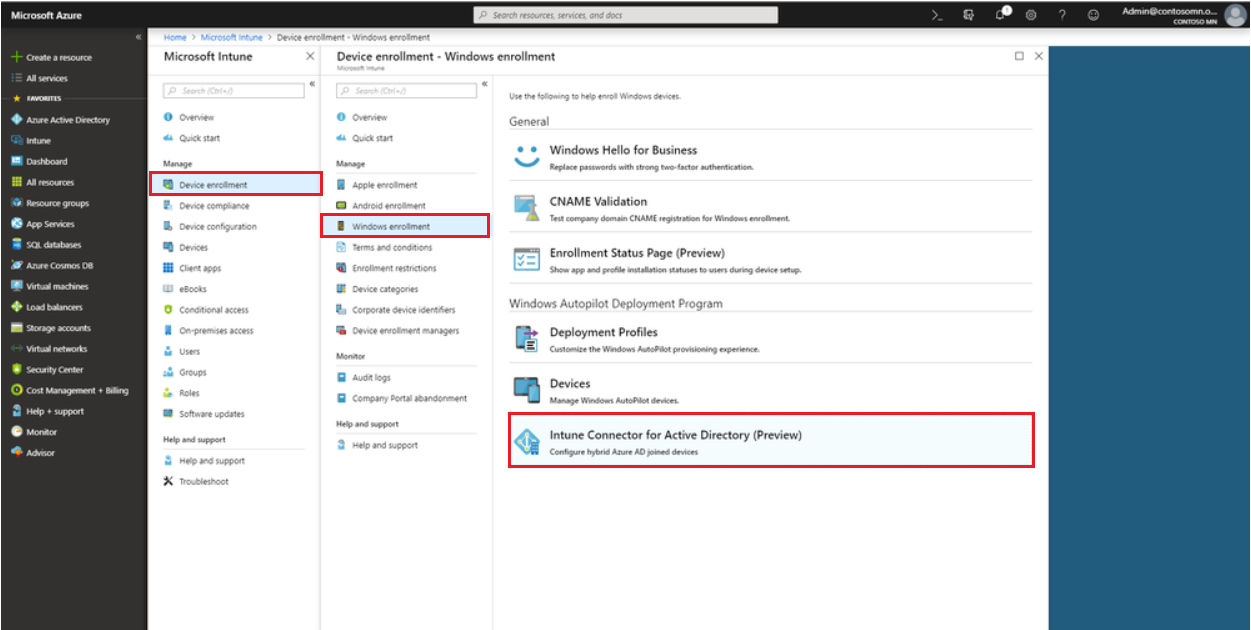
The prompts will guide you to the point where you open set up .exe file to finish the installation. Then choose Configure and authenticate with your admin credentials. In a few minutes you can check if everything went successfully -- the Connector status in Intune should change to Active.
3. Create DJ device configuration profile
The machine must "know" that you expect it to connect to your AD, and to "inform" it, the corresponding profile is needed. Here are the instructions on how to create it:
Autopilot for existing devices
A lot of customers don't have the budget to purchase new devices for everyone, and Autopilot can do the next-best thing by covering existing machines as well.
Register the device
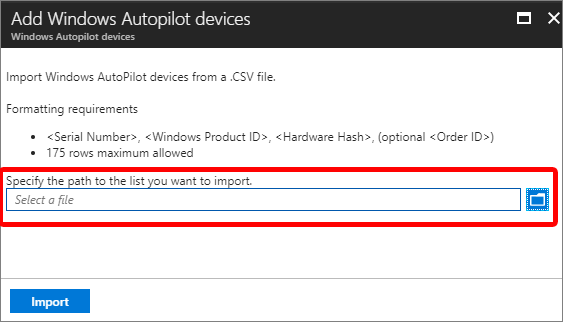
As usual, the first step is registering the existing devices in your estate, and this can be performed using PowerShell script . It should be run on every machine (with Windows 10 or higher), because it generates a harbor hash in the form of a CSV file that can be uploaded to any one of the portals that we mentioned before , but we specifically encourage you to use the Intune portal. This method is ideal for testing and validation with existing machines in your estate. If you wonder what this mysterious harbor hash is -- it's a very complex ID, effectively based on the hardware and software peculiarities of the machine. For this reason, it is impossible to harvest hardware hashes in Windows 7; but we will come back to this issue soon. These hashes are then uploaded into Intune.
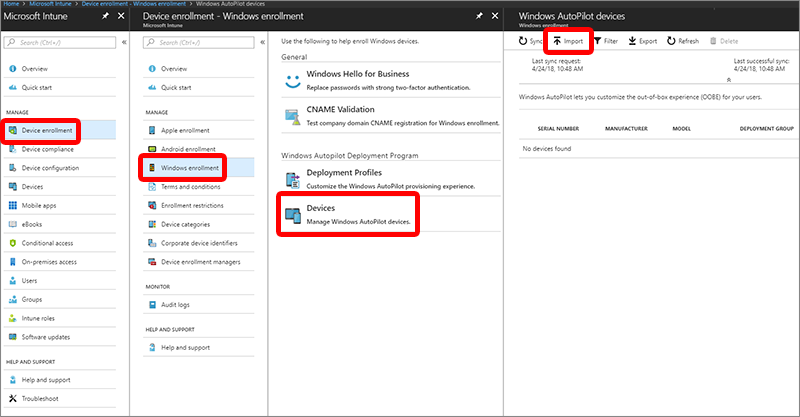
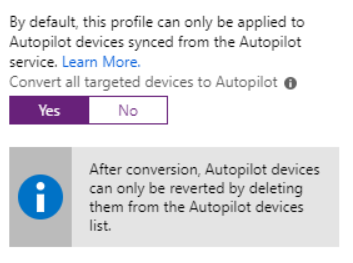
Another piece of functionality is the ability to register devices into Autopilot, if they are Intune enrolled -- just flip the switch in Intune and existing computers will automatically be registered into Autopilot. Remember, there should be a group containing all existing devices and a profile assigned.
If your existing Windows 10 devices are not already Intune managed,
there's a simple switch either through co-management with Config
Manager ,
or through a group policy automatically registering your newly
Intune-enrolled devices into Autopilot.
These are very powerful tools, especially this auto-enrollment through
Intune, to help you get a lot of the existing estate into a flow that
supports Autopilot.
Migrate from Windows 7 to Windows 10
If you have Windows 7, you are in a jam, as end of support (January 14, 2020) is rapidly approaching. But Autopilot can give you a hand in upgrading to Windows 10. This flow will comprise a few steps:
1. Deploy group policy to redirect data to OneDrive
Your Windows 7 device has data, files, and other items on it, and you want to make sure that data ends up on the upgraded machine. At the same time, migrating data as part of the typical Config Manager Task Sequence is quite a hassle. Instead, you can use OneDrive for Business and the Known Folder move to make sure everything in documents, pictures, and the major known folders get pushed to the cloud. Knowing that it's safe in the cloud, you can configure Intune to push down the OneDrive settings that will pull the data back on the upgraded device.
2. Generate Autopilot configuration file
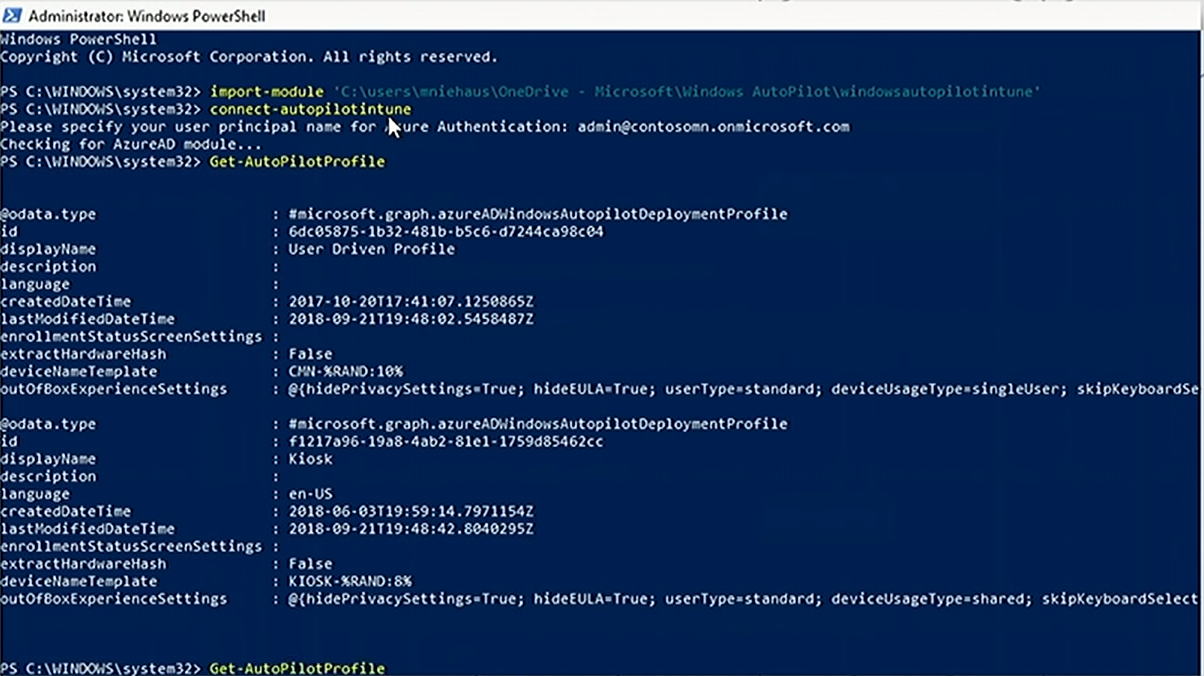
The easiest way of getting a configuration json file is again via PowerShell. Microsoft published a PowerShell script to load a module and then connect to Intune, using the Intune graph API. It will require specifying admin credentials and once you've authenticated, you will be able to query for a list of Autopilot profiles defined in Intune. The details of available profiles will look like this:
This information should be converted into json format, and the output on the screen will display the json equivalent of those profiles.
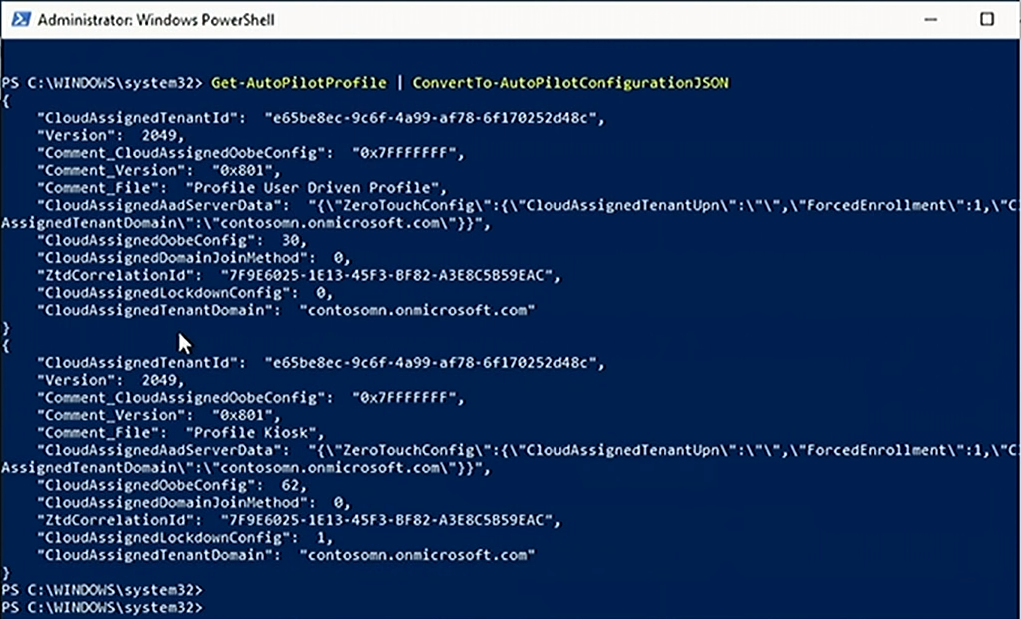
Json version should then be copy/pasted into a text file, which is dropped into the Windows folder as part of the Task Sequence to make the whole process flow.
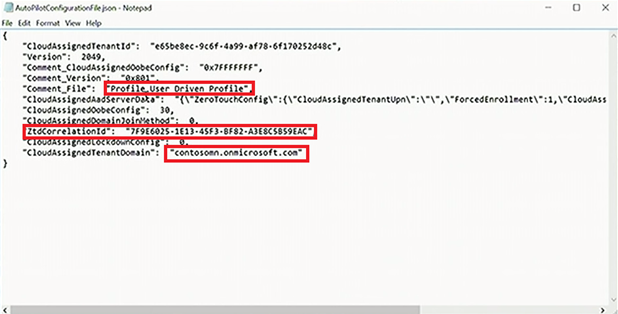
Looking closely at this particular json file, you can see the name of the tenant and all of the other Autopilot details. There's also a ZTD correlation ID (reported through Intune and assigned to the present Intune objects that have gone through and used this configuration file), which is useful to group those machines later, if you wish to.
3. Deploy Task Sequence to upgrade to Windows 10
A typical task sequence (TS) to upgrade to Windows 10 in Config Manager would probably be considerably bigger than this one:
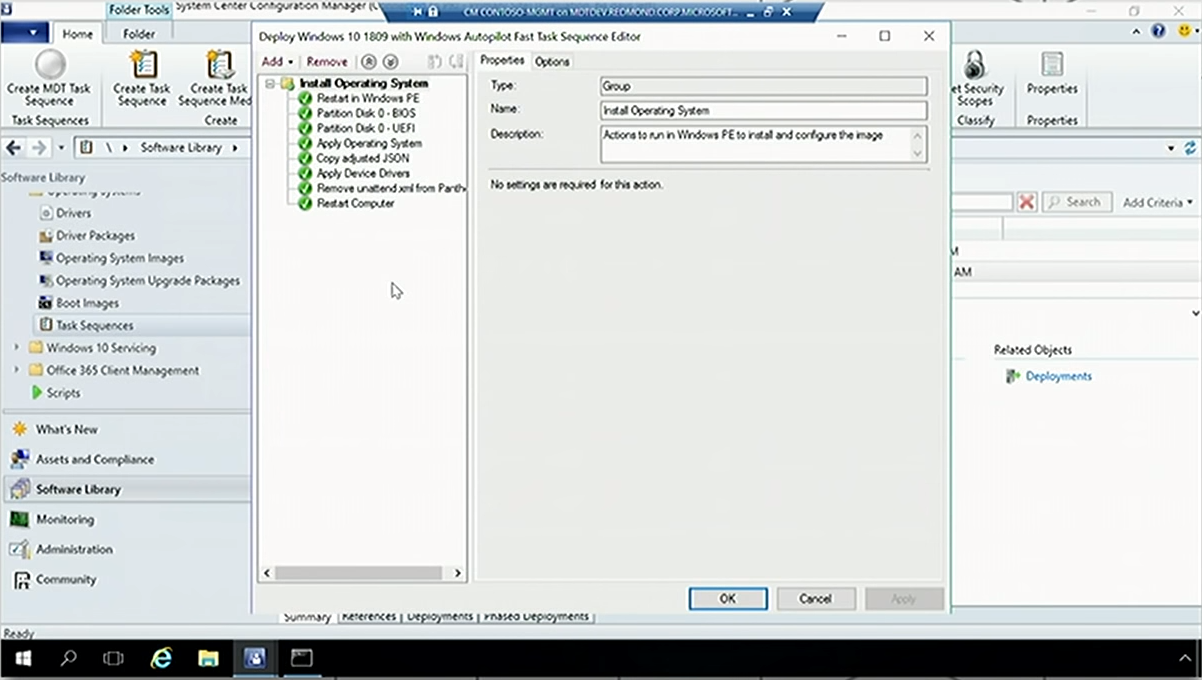
Its characteristic property is that it does no data migration (we already took care of that in the first step). TS only reboots to Windows PE (Preinstallation Environment), reformats the disk, depending on whether it's a BIOS or UEFI system, installs the operating system, copies the json into the right place, injects any device drivers needed for the specific hardware that you're running this on, and gets rid of the xml intended to automate the OOBE process, because it will be Autopilot's responsibility. After restart, the out-of-box experience will be customized by the json file.
4. Windows 10 machine goes through Autopilot on first boot
When the machine boots up for the first time, you will go through the normal keyboard, local, network connection stuff, and after that, it will read the configuration file, stating what Azure AD tenant the machine needs to join and other details. Authentication will happen on the customized branded log-on page and will complete the process of joining the machine to AAD, enrolling it into Intune, which will push the settings down. During that process, the enrollment status page will be displayed. Then you sign on as the user and finish the user configuration. If everything works, you end up on the desktop, where you can go back into file explorer and immediately see your files, because OneDrive was automatically configured to set up the Known Folder migration process.
So, now that we have discussed all possible scenarios ... you are good to go with your Autopilot. This is it, folks, at least for now. But more good features are on the road ahead, and we are going to cover them as soon as they appear. Stay with us to discover more twists and turns about Microsoft products in the next articles. Until next time!
Download our PDF Zero Touch Deployment.pdf
Share
2019-04-04