How to add Email Signatures in Exchange Online, Microsoft 365, Office 365
#microsoft 365, #office 365 tenant, #howto
Modern businesses are constantly striving for continuous business improvement. Email signature is an important part of day-to-day business operations and can become a powerful tool in achieving this goal.
Email signatures contain essential information and can brand every new email you send as you correspond with your clients, vendors, and prospects.
Managing email signatures for your entire company can be challenging but with Microsoft 365 or Office 365 you can easily create organization-wide email signatures and disclaimers.
There are a few ways to set up a signature in Microsoft 365:
Manually create and add a signature to your messages
In Outlook, you can create one or more personalized signatures for your email messages. Your signature can include text, images, your electronic business card, a logo, or even an image of your handwritten signature. It is possible to set up Outlook so that signatures are automatically added to all outgoing messages or create your signature and add it to messages on a case-by-case basis. You can provide your users with a prototype signature file on a periodic basis and ask them to update via Outlook/OWA. This is the easiest and quickest option as users can modify their signatures themselves. However, users are very often prone to forget to apply the update.
If you have a Microsoft 365 account, and you use Outlook and Outlook on the web or Outlook on the web for business, you need to create a signature in both products.
To create a signature using Outlook, follow the steps below:
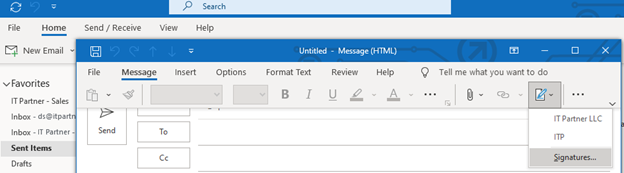
- Open a New email message and on the Message menu, select Signature > Signatures.
-
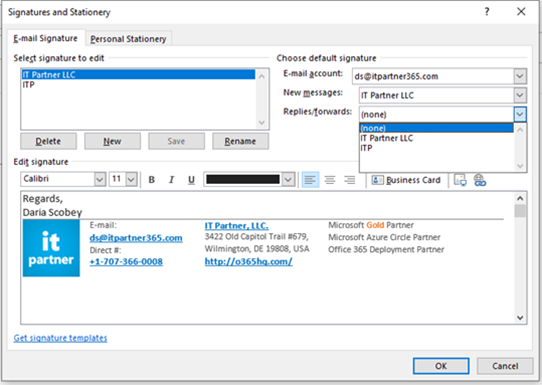
Under Select signature to edit, choose New, and in the New Signature dialog box, type a name for the signature.
-
Under Edit signature, compose your signature. You can add links and images, change fonts, font colors, and sizes, as well as text alignment. Microsoft offers pre-designed templates for your signature. Just download the templates in Word, customize them with your personal information, and then copy and paste them into the Edit signature box. To add images to your signature, see Add a logo or image to your signature.
-
Under Choose default signature, set the following options for your signature: In the E-mail account drop-down box, choose an email account to associate with the signature. You can have different signatures for each email account.
If you want your signature to appear in the messages you reply to and forward, in the Replies/forwards drop-down, select one of your signatures. Otherwise, accept the default option of (none).
- Choose OK to save your new signature and return to your message. To add the signature manually, select Signature from the Message menu and then pick the signature you have just created.
To create an email signature for Outlook on the web:
-
Sign in to Outlook on the web.
-
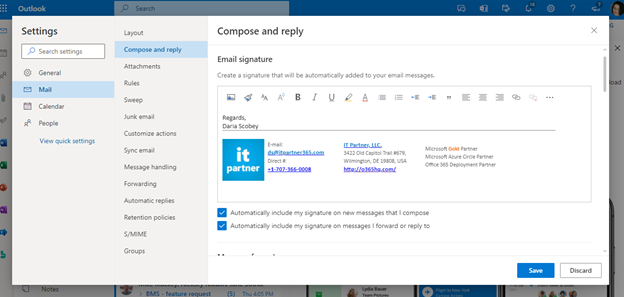
Go to Settings > View all Outlook settings > Compose and reply.
-
Under Email signature, type your signature and use the available formatting options to change its appearance. You can have only one signature per account.
-
In the text box, type your signature and use the available formatting options to change its appearance. NOTE: Inserting an image file (in a .gif or .jpg format for example) for your signature isn’t supported, but you can copy an image from a webpage and paste it into the signature box.
-
Select Save when you're done.
Create your company-wide Office 365 email signature using Exchange Transport Rules.
You can manage email signatures by adding an email signature, legal disclaimer, or disclosure statement to the email messages that enter or leave your organization. It is possible to set it up to apply to all incoming and outgoing messages or you can apply it to certain messages like those containing specific words or text patterns. The advantage of this approach is a guaranteed consistency in signatures. You will be guaranteed that signatures are stamped on all outgoing messages and if your Active Directory is correctly populated with the attributes you want to include (like phone number), the outbound signature will be complete.
To create a signature that applies to all messages:
-
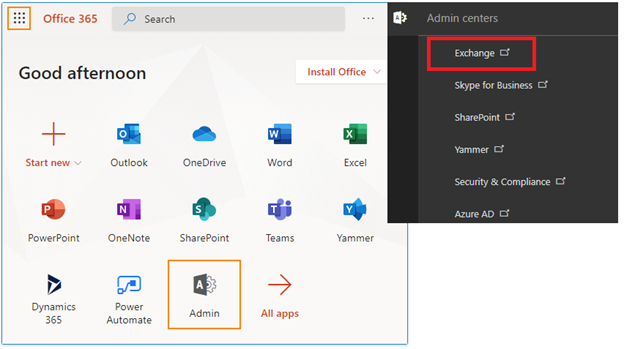
Go to the admin center at https://admin.microsoft.com, select the app launcher, and then select Admin.
-
Select Admin centers, and then choose Exchange.
-
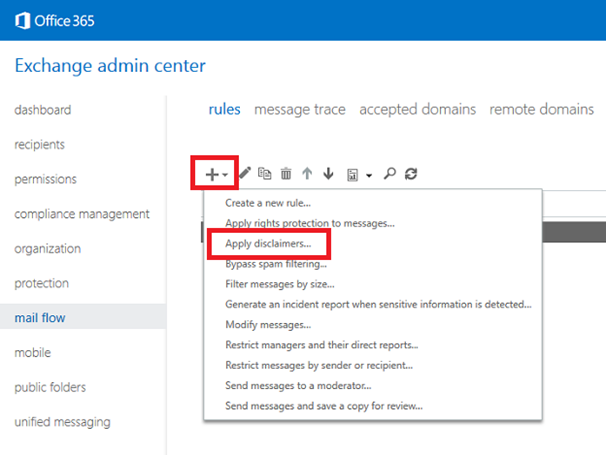
In the Exchange admin center under Mail flow, select Rules.
-
Select the + (Add) icon and choose Apply disclaimers.
-
In the new rule window, give the rule a name and configure the settings according to your needs.
-
Under Apply this rule, select [Apply to all messages]. It is also possible to select the conditions that will trigger the rule. Find the list of available conditions here.
-
Under Do the following, leave Append the disclaimer selected, select Enter text and type your disclaimer. Learn more about formatting disclaimers.
-
Next, select Select one and choose Wrap (forward the original message as attachment and stamp the forward) as a fallback option. Then OK. This means that if the disclaimer can't be added because of encryption or another mail setting, it will be wrapped in a message envelope.
-
Choose Enforce to turn on the disclaimer immediately, unless you want to test it first.
-
Choose More options to include additional conditions or exceptions.
-
Choose Save when finished and send a test message to check if the signature works as expected.
Unfortunately, there are some limitations of organization wide signatures. Common weaknesses are that:
- Users may add their own signature to the mix, images cannot be embedded in the email signature (recipients get them as attachments.
- Email signatures cannot be managed by non-admin Microsoft 365 users.
- Users cannot see the signature in their email client before sending an email or choose one of the available designs.
- You can`t skip lines which contain variables that couldn't be updated (e.g. because the value wasn't provided for a user).
- ETRs cannot process signed or encrypted messages.
Use a commercial product.
To gain these and other capabilities to manage email signatures, you can use a third-party tool. This way you pay for out-of-the-box solutions and get the advantages of years of experience and tons of experience gained from other customer engagements. If signature consistency is important to you, you should consider this option as the right way to get the best possible results.
Share
2021-05-11